
How to Prepare Photos for AI Painting: Turn Your Photo to Painting Like a Pro
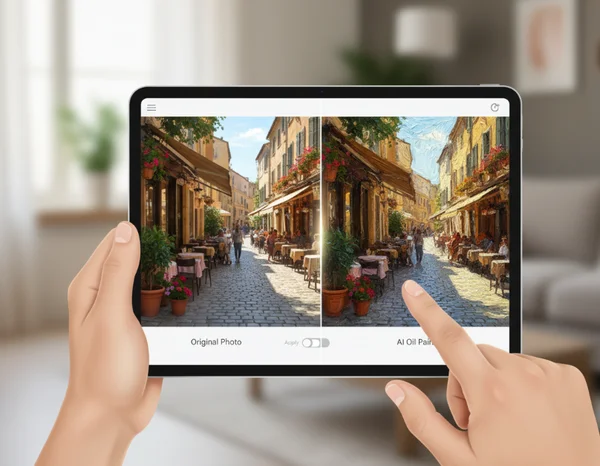
Want gallery-worthy AI paintings? Start with a perfectly prepped photo. Here’s how: Imagine your favorite sunset or a family portrait as a classic oil painting. Many users upload images only to see muddy or distorted results. The secret to breathtaking art isn't just the filter; it's the preparation.
Even the most advanced AI art generator needs high-quality input to produce high-quality output. If the source image is poor, the algorithm struggles to interpret shapes and textures. This leads to digital artifacts rather than artistic brushstrokes.
This guide shares professional techniques to transform any snapshot into the perfect canvas for AI conversion. Whether you are a creative pro or a hobbyist, these tips help you convert photos into art that looks intentional and sophisticated.
Understanding AI Photo to Painting Requirements for Oil or Watercolor Styles
To get the most out of the software, you need to understand what the engine "sees." AI does not view a photo the way humans do. It looks for patterns, edges, and color gradients. When these elements are clear, the transformation is seamless. When they are messy, the painting looks like a digital smudge.
Why Photo Quality Matters for AI Conversion
Photo quality is the foundation of any digital art project. When you use a photo to painting tool, the algorithm analyzes every pixel to decide where to place a brushstroke or a pencil line. If a photo is pixelated or has graininess, the AI might mistake that noise for a detail that belongs in the final artwork.
High-quality images provide a clear map for the system. For instance, if you want a detailed oil painting, the AI needs to see the texture of the skin or the fabric. This allows it to simulate realistic brushwork. By starting with a sharp image, you ensure that the AI painting generator tool can focus on being creative rather than trying to "fix" your photo.
How AI Algorithms Analyze Your Images
AI painting tools analyze photos like an artist studies a canvas—searching for edges, contrasts, and textures. To avoid blurry results, give it clear boundaries between objects. These tools use neural networks trained on thousands of masterpieces by artists like Monet or Picasso.
The AI identifies the "content" of your photo and applies the "style" of a painting. If your photo has a busy background where the subject blends into the surroundings, the AI might get confused. Choose photos with a clear subject to create professional AI art that looks clean and focused.
Essential Prep for Stunning Oil Painting and Watercolor Conversions
You don't need to be a professional photographer to get an image ready for AI. However, following basic photography rules will significantly improve your conversion results. These techniques focus on making the image "readable" for the AI engine.
Lighting and Composition Tips for Better Results
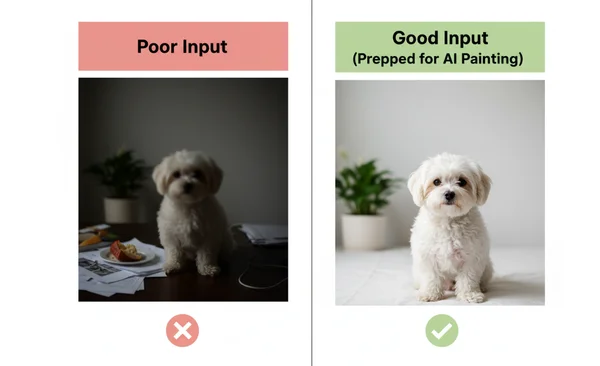
Lighting is the most important factor in visual media. For AI painting, natural, soft light is usually best. Avoid photos taken in very dark rooms or under harsh, direct sunlight that creates deep shadows. AI can interpret dark shadows as missing data, resulting in strange artifacts in your final painting.
Composition also plays a major role. Try the "Rule of Thirds" by placing your main subject slightly off-center for a more dynamic look. If you are converting a portrait, ensure the face is well-lit. Proper composition allows the generator to apply textures in a way that feels natural rather than flat.
Resolution and File Format Guidelines
Size matters when it comes to digital transformation. Low-resolution photos starve the AI of vital data. For crisp results, use images with at least 1080 pixels on the shortest edge. Photos taken with modern smartphones are usually more than enough for a high-quality photo to painting conversion.
Regarding file formats, stick to JPEG, PNG, or WEBP. These maintain a good balance between quality and file size. PNG is often better for images with fine detail because it is a "lossless" format. If you want the highest quality, try our free photo-to-painting converter with a high-resolution PNG.
Subject Positioning and Background Considerations
A common mistake is using a photo with a cluttered background. If there are power lines or distracting objects behind your subject, the AI will try to paint those too. This pulls the viewer's eye away from the main focus of your artwork.
If possible, use a photo with a simple or slightly blurred background. This "bokeh" effect helps the subject stand out. The AI will focus its most detailed brushstrokes on the subject while the background remains a soft, painterly texture. You can see your custom oil painting results improve instantly just by simplifying your backdrop.
Solving Common Photo Issues for Better Painting Results
Sometimes, you don't have the perfect photo. Perhaps it is an old family picture or a quick snapshot that came out slightly blurry. Most of these issues can be fixed with a few seconds of editing before you start the conversion process.
Fixing Blurry or Low-Quality Photos Before Conversion
If your photo is slightly blurry, the final painting might look "mushy." To fix this, use a basic photo editor to increase the "Sharpness" or "Clarity." Be careful not to overdo it, as too much sharpening creates white lines around the edges that look unnatural in a painting.
For very low-quality photos, consider using an AI image upscaler first to add pixels back into the image. Once the image is sharper, it is much more suitable for a free photo to painting converter. Remember, the AI can only work with the pixels you provide.
Enhancing Details for More Accurate Style Transfer
If your photo lacks "pop," the AI painting might look dull. This happens when there isn't enough contrast between light and dark areas. To solve this, increase the "Contrast" and "Saturation" slightly before uploading.
Higher contrast helps the AI identify edges and depth. For example, in a watercolor style, the AI uses contrast to decide where the "water" would naturally pool and create darker pigment. Once you have adjusted your photo, start the AI conversion tool to watch your image become a vibrant masterpiece.
Your photo is prepped and polished. Now, watch your memories become masterpieces!
Prep your photo in minutes: perfect the lighting, boost resolution, and clear the background. These simple steps guarantee AI-ready quality. Proper preparation is the difference between a generic filter and a genuine work of art.
Whether you are creating a gift or unique content for your business, the quality of your input determines the beauty of your output. These simple optimization steps ensure that every brushstroke feels intentional. Ready to see the difference? Upload your optimized photo to PhototoPainting.ai today and experience a stunning transformation!
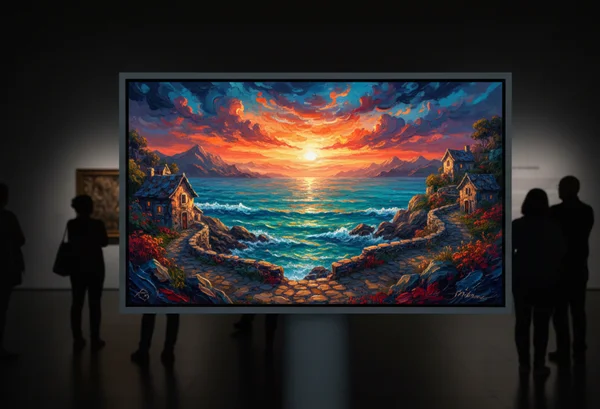
Photo Preparation for AI Painting
What's the minimum resolution needed for quality AI painting results?
For the best results, your photo should be at least 1024x1024 pixels. While the tool can process smaller images, higher resolutions allow the AI to capture fine details like hair, eye color, and fabric textures. Standard smartphone photos are usually perfect for this.
Can I fix blurry photos before converting them to paintings?
Yes, you should! Use a sharpening tool or an AI upscaler to improve the clarity of a blurry photo before converting it. A blurry input often leads to a "smudged" painting. Once the image is clear, you can apply styles like oil or sketch for a much better result.
How does lighting affect the final AI painting output?
Lighting dictates the shadows and highlights in your painting. Good lighting creates a sense of depth and 3D form. If a photo is too dark, the painting may lose detail in the shadows. We recommend using photos with clear, even lighting to ensure the generator produces vibrant colors.
Are there specific file formats that work better than others?
We support common formats like JPEG, PNG, and WEBP. PNG is generally preferred for the highest quality because it doesn't lose detail through compression. However, JPEG is also excellent and very fast to upload.
Should I edit my photo before converting it to a painting?
While it is not strictly necessary, minor edits help significantly. Adjusting the contrast, brightness, and saturation can give the AI a better guide for colors and shapes. Many users find that a slightly more vibrant photo leads to a more artistic painting.